"Act as a programmer when you want to code your career. Act as a debugger when you want to refine your career." – Amarnath Krishnan

Introduction:

Isomorphic JavaScript applications are those applications which make use of the same JavaScript code in the server side as well as the client side.

As the web application stack is evolving, there are lot of possibilities to achieve this.

Why Isomorphic Application?

To dynamically change data we can’t always reside on hitting the server to get the changed HTML because it is costly and we need to manipulate a lot of DOM Elements to render the changed content.

The better approach would be to use any Dynamic JavaScript frameworks/library(React, Angular, Mithril, etc) which will make API calls to get JSON content from server and do the rendering part in the front-end.

The challenge with this approach is, whenever you need to make a change, you need to do it in both ends(the server side script which is not JS and as well as the client side JavaScript) which is a pain since we need to maintain both the script in sync to provide better user experience and have good SEO impact.

One better approach to solve this problem is to use same code in both client and server.

JavaScript in Server Side:

Node.js is a JavaScript runtime built on Chrome’s V8 engine which allows to execute JavaScript in the server side. There are several web application frameworks(express, hapi, mojito, etc) which can help one to host server side JavaScript Apps. My personal favorite is express.js.

With node.js and any other JavaScript library one can easily host a isomorphic JavaScript Applications.

Simple Isomorphic JavaScript Application:

I am going to demonstrate a simple Isomorphic JavaScript application built using express.js, mithril.js. This app will have a square placeholder which will be filled with user selected colors and change colors when user switch through the different available colors.

This app uses the same code(demo_app.js) in both sides
1.) Server Side – To build the HTML contents
2.) Client Side – To remount the DOM elements and to activate the event handlers.

You can see a live demo here

Wondering whether this will suit a enterprise applications? Of course it is. We used to get millions of hits and it works like a charm.

We used to come through this statement Everything is an object in Ruby often in the ruby world. So by default, ruby uses pass by reference? May be.. May be not..

So lets validate it by performing some basic operations.

Experiment 1:

exp_1_code

exp_1_console

Works Perfectly. The manipulated value is retained even after the scope of the function. Here the operations  are performed on the variable reference so the manipulations are retained. Lets continue our experiment with operations on FixNum values.

Experiment 2:

exp_2_code exp_2_console

As per the intuition, it should hold the manipulated value. Unfortunately, here the manipulated value of the arg is not retained. When the block has finished its execution, the original value has not been updated and the manipulations happened inside the block had a dead scope.

To clarify it, lets revamper experiment 1 code as below since ruby provides flexibility to do something in many ways.

Experiment 3:

exp_3_code exp_3_console


Again we lost our manipulations. So ruby is “Pass by Reference”?

If so then why experiment 2 & 3 retained the original value instead of manipulated value.
May be we should examine the object id to get a closure on it. Let us again run the above 3 experiments and analyze its object id.

Experiment 1:

exp_1_1_code exp_1_1_console

Experiment 2:

exp_2_1_code exp_2_1_console

Experiment 3:

exp_3_1_code exp_3_1_console

The above results shows that whenever assignment operation is employed it do create a new object reference. This concludes that assignment operations creates a new reference and its scope ends within that block where as other operations are performed with the same reference.

Note:
More analysis on this linked me to this post where they say ruby uses “call by sharing”. Call by sharing seems to be a new term to me.
http://en.wikipedia.org/wiki/Call_by_sharing#Call_by_sharing

Paranoid Scaffold

login

I’ve just checked my blog and was quite disappointed to see the last post was before 5 months. Kind off busy with my stuffs. Recently i was working on a RoR project and got used to the flexibility of RoR.

Today am going to showcase the use of soft deletion and CRUD operation using Acts as Paranoid and Active Scaffold Gem. There may be cases where you should be able to restrict certain users to view certain records, delete certain records(soft deletion),etc. Here soft deletion refers to hiding data from users when it has been deleted, but not really dropped from database.

Overview on Paranoid Gem:

This gem provides functionality to hide(soft delete) data records and recover(showcase) the same. The data types supported by this Gem is listed below:

* boolean
* time
* string

Even though it supports boolean, the transactions are not True/False based. It always retrieves record with paranoid column having nil value except for string type columns. For string type columns, it will retrieve record with paranoid columns having nil or paranoid column not having the deleted value specified in the respective model.

Some basic operations:

Model.all -> Retrieves only the active records
Model.with_deleted.all -> Retrieves only the inactive records(soft deleted records)
Model.only_deleted.all -> Retrieves all records(both active and inactive)
Model.find(1).destroy -> Hides the active data record with id=1(make it inactive)
Model.only_deleted.find(1).recover -> Shows the inactive data record with id=1(make it active)
Model.find(1).destroy! -> Removes the data record from Database

It supports with_deleted only on belongs_to association.
In my previous project, the column was of integer type(Not supported by paranoid) and we had to do some monkey patch stuff to accommodate our needs.

Overview on Active Scaffold Gem:
Active Scaffold makes your life easy by providing a CRUD based structure that allows you to tabulate data records with pagination and CRUD operations. This gem can be configured as per the user needs.

Some basic Actions:

Create – Allow creating new records
List – List all data records
Search – Enable Searching of data records
Update – Update data record
Show – Show data records
Delete – Delete data records
Nested – Allows to edit relational data
Sub form – Allows CRUD of a model different from the present controller

It also allows you to use user-defined actions via action links. In our example Activate and Destroy are used defined methods. In order to use user defined methods, you have to do some changes in the routes.

To demonstrate it, we can consider a college management application. Here only admin’s can view records of all students(currently studying,alumni,etc). The faculties should access only the details of students currently pursuing their degree but other admin’s may access records of all students.

You can checkout the code base here and view it here.

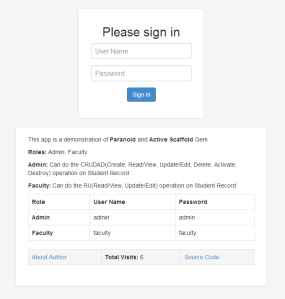
Moving Forward, we will be talking about two roles(Admin/Faculty).

Admin – Can view all records and perform CRUDRD(Create, Read, Update, Delete, Restore, Destroy)actions on Student record.
Here Delete refers to hiding(soft deletion) and Destroy refers to real deletion(remove data record from database).

admin

Faculty – Can view only Active records and perform RU(Read, Update) actions on Student record.

faculty

Sample Rails app:

1.Create a rails app

rails new manage

2. Add active_scaffold, acts_as_paranoid to Gemfile and bundle install.

3. Add active_scaffold to application.css and application.js

4. Create models for branch, role, gender, student, user,etc

rails g model role name:string description:text
rails g active_scaffold gender name:string
rails g active_scaffold branch name:string description:text
rails g model user role_id:integer username:string encrypted_password:text
rails g active_scaffold student rollno:string firstname:string lastname:string branch_id:integer gender_id:integer status:string

5. Add custom methods for models(Activate, Destroy)

 def destroy_record
   @record=Student.only_deleted.find(params[:id])
   flash[:info] = “Record with Firstname #{@record.firstname} has been Removed from Database”
   @record.destroy
   return_to_main
  end
def activate
    @record=Student.only_deleted.find(params[:id])
      flash[:info] = “Record with Firstname #{@record.firstname} has been Restored”
    @record.recover
  return_to_main
  end

6. Add custom methods to routes.

 resources :students do
      member do
         get ‘activate’
         get ‘destroy_record’
      end
  as_routes end

7. Add configuration for Student Controller

active_scaffold :”student” do |conf|
    conf.label=”Student Details”
    conf.actions=[:create,:list,:search,:update,:delete,:subform]
    conf.delete.refresh_list = true
    conf.columns=[:rollno,:firstname,:lastname,:gender,:branch,:status]
    conf.search.columns = [:firstname,:lastname]
    conf.columns[:gender].clear_link
    conf.columns[:branch].clear_link
    conf.search.live=true
    conf.list.always_show_search=true
    conf.list.per_page = 25
    conf.action_links.add ‘activate’, :label => ‘Activate’, :type => :record, :confirm => ‘Do you want to restore record?’, :page => true
    conf.action_links.add ‘destroy_record’, :label => ‘Destroy’, :type => :record, :confirm => ‘Do you want to remove record from Database?’, :page => true
 end

GitHub Website Hosting

githubWe can host our web projects online throough GitHub Pages within minutes. GitHub provides GitHub Pages which helps individuals to host their GitHub project online. Lets us now demonstrate how to use GitHub Pages. GitHub provides GitHub GUI and Git Shell to work with our remote repository. Let us now use Git Shell to move forward.

To demonstrate it, let us now create a sample project called GitHub_ Hosting. Here we are going to create a simple html page and a readme file.

create_dir

To make our directory as a git repository, we have to initiate git.  Initiating git will convert the directory to a local git repository with master branch. In the master branch lets create a readme file.

git init – Initiates git repository

create_readme

Let us now check git status. We have our readme file untracked. Now we can create a index.html file that will act as a home page at GitHub Pages.

git status – Show tracked and untracked files.

create_index_page

Now lets add the untracked files to the commit list.

git add . – will add all untracked files to the commit list

Git status will now displays those two files under the commit list.

Let us now commit our files to the local repository track list with a commit message “First simple website”.

git commit -m “commit_message” – commits the file to repository track list

git log – displays the commit history

commit

Let us now create a remote repository at github.com. Login to your github account and create a new repository by choosing New Repository.
create_repo

Provide repository name and choose between public and private repositories and create a repository.

step2

Let us now add a origin(repository label) to our remote repository. The origin can be used to communicate with the repository henceforth. Here we have linked the Github_Hosting repository to myorgin.

myorigin can be used to fetch and push data from GitHub_Hosting remote repository.

git remote add origin_name ssh_path – links the origin_name to ssh_path to simplify communication

git push -u origin_name branch_name – push the branch to the give origin

push

Now we can check our remote repository for the files been pushed. So both readme and index files has been pushed to the remote repository under master branch.

master

Git Hub Pages:

Github Pages can be created with a particular branch name “gh-pages“. Github will automatically host the web pages inside this branch online within seconds. So now we create a new branch called “gh-pages” and checkout it. Finally lets push the gh-pages branch to the remote repository.

git branch – will display the branches available

git branch branch_name – will create a new branch with the given branch_name

git checkout branch_name – to switch to given branch_name.

gh-pages-branch

Now we have successfully pushed our hosting branch “gh-pages” to the remote repository. So we have two branches in our remote repository now.

gh-pages

The web project inside the gh-pages repository will be hosted online under github.io within few minutes. Now we can access our site online with our repository name.

username.github.io/Repository_Name/ – used to view our site online

web_page

Mars Rover JavaScript

marsroverClick Image to See Demo

One of my friend asked me to explain Mars Rover problem and  write algorithm for the same. I tried explaining him theoretically, but he couldn’t catch  it up quickly. So i just thought of explaining  the problem statement and how  it works more clearly and in-depth. While explaining him, i just thought why shouldn’t  i explain it in my blog so that it may be helpful for someone too. I thought of explaining the problem visually so just created a webpage which explains the problem clearly. I have used javascript to make up animations and movements. Wondering why JavaScript? Because i love JavaScript.

Problem Statement:

A robotic rover is to be landed by NASA on a plateau on Mars. This plateau, which is curiously rectangular, must be navigated by the rover so that their on-board cameras can get a complete view of the surrounding terrain to send back to Earth.

A rover’s position and location is represented by a combination of x and y co-ordinates and a letter representing one of the four cardinal compass points. The plateau is divided up into a grid to simplify navigation. An example position might be 0, 0, N, which means the rover is in the bottom left corner and facing North.

In order to control a rover , NASA sends a simple string of letters. The possible letters are ‘L’, ‘R’ and ‘M’. ‘L’ and ‘R’ makes the rover spin 90 degrees left or right respectively, without moving from its current spot. ‘M’ makes the rover move forward one grid position, and maintain the same heading.

You can check out the demo here and can check out the code base here.

What i have done?

Since its a web page i couldn’t allow user to create more grids. So i have constraints with x and y co-ordinates. My app is limited with x coordinate 0 < X <=30 and y coordinate 0 < Y <=14. The grid is restricted with 30 and 14 because to avoid scrolling while creating the grid.

Once the grid  is constructed the app will ask user for the initial positions( x and y coordinates) and the initial direction faced with the input string. Based on the input string, the rover will move.

Example:

Grid Size: 10, 10

Initial Position: 5 , 5  S

Input String: LMMMMLMMMMLMMMMLMMMMR

Result: 5 , 5  W

The rover is initiated at 5,5 coordinate facing South direction. Moving Left makes the rover face East. Now the rover moves 4 grid positions and turns left facing North. Now the rover again moves 4 grid positions and turns Left facing West. Now again the rover moves 4 grid positions and turns left facing South. Now the rover moves 4 grid positions and turns right facing West. Final position is 5,5 facing West.

Image source: http://guy-pyrzak.blogspot.in/

Click-o-Mania

CLICK

Click Image to view Demo

I was just playing some flash games online. Suddenly I get into some web link where I found a game called click-o-mania. It was nice playing it. I was just wondering how it works and tried to create its mimic by myself and ended up writing this blog post. When I wrote an algorithm to mimic its working I was wondering in which language should i implement it. Then I thought it would be great if I implement it as a GUI game so that I can view the upper block making its way down and blocks shifts its place from right to left at certain points.  Then I decided to go with JavaScript because it provides more flexibility and I love JavaScript. So now what?

Wish to give it a try? Click Here

You can look into the complete code base here.

Constraints:

1.)    Blocks should be disappeared when it has any adjacent blocks (North, South, East and West) with same property.

2.)    When the blocks in the down shelf disappeared than the other blocks in the upper shelf should make its way down.

3.)    When the blocks in a column are disappeared, then the adjacent right column blocks should make its way to its left.

Some of the functions I used in my program.

 initializeMatrix() – To create blocks.

checkAdjacent() – To check whether a block has a neighbor sharing the same property as it.

shade() – To shade the blocks having same property.

Fill() – Fill the blocks sharing the same properties .

slideDown() – Slide Down the upper level blocks it there is no lower level block.

slideLeft() – Slide Left if left column is free.

One of my friend asked me today to write him a Factorial program in C. I wrote it and he started testing it with different test cases. It was weird to see my code failing for larger values. I was confused. Later while analyzing, i realized that all primitive data types in C have a range. So when doing factorial for larger values, it exceeded the primitive data range and my result were in negative values. So what then? My friend said that if i could give him a code that would work for all N, then he would take me for dinner to any restaurant of my choice. But the good part is, he never asked me to take him out if i couldn’t provide him a solution. It seemed to be a decent deal, so i readily accepted his offer and spent some time in coming up with a solution. I am just sharing it here hoping it would help any beginners..

I have used doubly linked list to store the result.

So here is the Structure

typedef struct node
{
struct node *prev;
int data;
struct node *next;
}ns;

Function to create a node which will hold the data.

ns* createnode(int x, ns *pre)
{
ns* temp=(ns*)malloc(sizeof(ns));
temp->prev=pre;
temp->data=x;
temp->next=NULL;
return temp;
}

Factorial Module:

ns* factBigNo(int n)
{
ns* start=NULL;
int i,temp,j,q;
start=createnode(1,NULL);
ns* ptr=NULL;
for(i=2;i<=n;i++)
{
j=0,q=0;
for(ptr=start;ptr!=NULL;ptr=ptr->next)
{
temp=ptr->data;
ptr->data=(temp*i+q)%10;
q=(temp*i+q)/10;
tail=ptr;
}
if(q!=0)
{
while(q!=0)
{
tail->next=createnode(q%10,tail);
tail=tail->next;
q=q/10;
}
}
}
return tail;
}

Shelfari with Backbone

backbone

Recently, I was exploring Backbone. It was a wonderful experience and taught of sharing my app and code. Hope this post could help some beginners to understand Backbone. I have created a basic application (Shelfari: http://shelfari-ami1906.herokuapp.com/) with Backbone. I am  going to document how I had achieved my objective. Before getting into the application, let me give you a small overview on BackBone and Shelfari. Backbone: Backbone is a JavaScript based MV* Framework. With backbone, you represent your data as Models. Here the models are organized as Collections. The five main terms involved with Backbone are:

Models – Where all the data are stored.

Routers – Create routes to trigger events.

Templates – Layout of your Application(HTML).

Views – Binding of templates and defining events.

Collections – Organization of Models.

Using Backbone we can create single page applications with multiple views, each defining multiple events. Shelfari: It  is an online manager where you can store details [Book Name, Author Name, Status] of any books. You can browse for any books, add book details, edit book details and remove unwanted book details. Let us now create Shelfari with Backbone JS. Here I am going to use a local storage [array] to store the book details.  I have used backbone-min,  jquery-1.7.1.min,  json2, underscore-min JavaScript files. You can get the full code from github.

Step 1: Create an  html page where all the layout resides. I have used a form over here to add books.

<form id="addBook" action="#" >
<table>
<tr><td><label>Book Name:</label></td><td><input type="text" placeholder="Enter Book Name" id="name" /></td></tr>
<tr><td><label>Author Name:</label></td><td><input type="text" id="author" placeholder="Enter Author Name" /></td></tr>
<tr><td><label for="status">Status:</label></td>
<td>
  <select id="select">
  <option value="Read">Read</option>
  <option value="Unread">Unread</option>
  </select>
</td>
<td><button id="add" >Add</button></td></tr>
</table>
</form>
 Step2: Creating templates for views. I am using two template.
  • bookTemplate – This template is used to display book details
<script id="bookTemplate" type="text/template">
 <table>
 <tr><td height="25"><b>Book Name:</b></td><td><%= name %></td></tr>
 <tr><td height="25"><b>Author Name:</b></td><td><%= author %></td></tr>
 <tr><td height="25"><b>Status:</b></td><td><%= status %></td></tr>
 <tr><td><button class="edit">Edit</button></td><td><button class="delete">Delete</button></td></tr>
 </table>
</script>
  • bookEditTemplate –  This template is employed with a form to do edit actions
<script id="bookEditTemplate" type="text/template">
 <form id="editBook" action="#">
 <table>
 <tr><td><b>Book Name:</b></td><td><input id="name" type="text" value="<%= name %>"/></td></tr>
 <tr><td><b>Author Name:</b></td><td><input id="author" type="text" value="<%= author %>" /></td></tr>
 <tr><td><b>Status:</b></td><td>
   <select id="editSelect">
   <option value="Read">Read</option>
   <option value="Unread">Unread</option>
   </select></td></tr>
 <tr><td><button class="save">Save</button></td><td><button class="cancel">Cancel</button></td></tr>
 </table>
 </form>
 </script>

Step 3: Create a model to store data and a collection to store models.

var Book = Backbone.Model.extend({
 defaults: { name: "", author: "", status: "" } });
var Library = Backbone.Collection.extend({
 model: Book });

Step 4: Create a LibraryView, which is the default view of the application.

var LibraryView = Backbone.View.extend({
 el: $("#books"),
initialize: function () {
 this.collection = new Library(books);
 this.render();
 this.collection.on("reset", this.render, this);
 this.collection.on("add", this.renderBook, this);
 },
render: function () {
 this.$el.find("book").remove();
 this.input=this.$('li .search');
 _.each(this.collection.models, function (item) {
 this.renderBook(item);
 }, this);
 },
renderBook: function (item) {
 var bookview = new BookView({
 model: item
 });
 this.$el.append(bookview.render().el);
 },
events: {
 "keypress li .search": "updateOnEnter",
 "click #add": "addBook",
 "click li .addition": "showForm"
 },
updateOnEnter: function(e){
 if(e.which == 13){
 this.filter();
 }
 },
filter: function () {
 this.collection.reset(books, { silent: true });
 var filterValue = this.input.val().trim().toLowerCase();
 filtered = _.filter(this.collection.models, function (item) {
 return item.get("name").toLowerCase() === filterValue;
 });
 this.collection.reset(filtered);
 booksRouter.navigate("book/"+filterValue);
 this.input.val("");
 },
addBook: function (e) {
 e.preventDefault();
 var data = {};
 data["name"]=$("#addBook #name").val();
 data["author"]=$("#addBook #author").val();
 data["status"]=$("#addBook #select").val();
 books.push(data);
 this.collection.add(new Book(data));
 $("#addBook #name").val("");
 $("#addBook #author").val("");
 },
showForm: function () {
 this.$el.find("#addBook").slideToggle();
 }
 });

Methods involved in the Library View:

initialize() – This is a constructor that would be called when a LibararyView object is created

render() – It renders the View of the application. It appends all the books to the view

renderBook() – Add book to the view

updateOnEnter() – It defines what should happen when enter key is pressed in the search box

filter() – Used to filter certain book details based on users search

addBook() – Adds the new book details to the local storage(array) and renders the view

showForm() – slideToggle the order entry form.

Step 5: Create a BookView to display book details. This BookView will use two templates one for displaying book details and other for allowing user to edit book details.

var BookView = Backbone.View.extend({
 tagName: "book",
 className: "book-container",
 template: _.template($("#bookTemplate").html()),
 editTemplate: _.template($("#bookEditTemplate").html()),
render: function () {
 this.$el.html(this.template(this.model.toJSON()));
 return this;
 },
events: {
 "click button.delete": "deleteBook",
 "click button.edit": "editBook",
 "click button.save": "saveEdits",
 "click button.cancel": "cancelEdit"
 },
deleteBook: function () {
 this.model.destroy();
 this.remove();
 },
editBook: function () {
 this.$el.html(this.editTemplate(this.model.toJSON()));
 },
saveEdits: function (e) {
 e.preventDefault();
 var data = {};
 data["name"]=$("#editBook #name").val();
 data["author"]=$("#editBook #author").val();
 data["status"]=$("#editBook #editSelect").val();
 this.model.set(data);
 this.render();
 },
cancelEdit: function () {
 this.render();
 }
 });

Methods involved in BookView:

deleteBook() – Deletes the book details from the library

editBook() – loads the bookEditTemplate allowing user to edit book details

saveEdits() – To update the model with updated data set

cancelEdit() – To revert back the edit mode

Step 6: Initiating the Views and start the Backbone history

var library = new LibraryView();
Backbone.history.start();

In this tutorial, i am going to explain how to create an HL7 message by reading data values from database using Database Reader. I have used a simple table to demonstrate the worflow . Add more queries based on your requirements.

I am going to use the following database schema and data values in this tutorial

Image

ImageNow we are going to create a channel that reads data with status 0 from the patient table and create a HL7 ORM message  and update status to 1.

summary

Choose any Channel Name as you wish. Set the Datatypes here or you can do it inside transformer. Store the messages or prune it after specified period of time as you wish.

source_connector

In the Sorce Connector, select Connector Type as Database Reader. Provide the Driver info and insert the URL template. Modify the URL template configuring the host, port and Database name.   Provide the Database credentials and choose the polling ype.

Interval: Polls the database repeatedly after the specified polling frequency.

Time: Polls the database at the specified time.

Enable Use JavaScript if you want to do some manipulations over there other then database reading.  Here i have queried to read the patient table to get pid, pname, psex, pdob based on status flag. Enable Run On Update Statement if you wish to update something after reading data from table. Here i have updated the status flag to 1 such that those details will not be read again. You can now see the selected data values in the right side of On Update SQL. These selected values will be passed as an xml to the source inbound template.

source_trans

Write your custom code in the transformer. I have written the following code to create a simple HL7 messsage with single OBR Segment. You can create any number of Segments as per your requirements. Since your output to the desitnation is an HL7 message choose your Outbound Message Template Datatype to HL7 v2.x.

channelMap.put(“pid”,msg[‘patient_pid’].toString());
var currentdate=DateUtil.getCurrentDate(“yyyyMMddHHmmss”);

//Adding data to MSH Fields
tmp[‘MSH’][‘MSH.3’][‘MSH.3.1’]=”XYZ”;
tmp[‘MSH’][‘MSH.4’][‘MSH.4.1’]=”123″;
tmp[‘MSH’][‘MSH.5’][‘MSH.5.1’]=”ABC”;
tmp[‘MSH’][‘MSH.6’][‘MSH.6.1’]=”456″;
tmp[‘MSH’][‘MSH.7’][‘MSH.7.1’]=currentdate;

//Adding data to PID Fields
tmp[‘PID’][‘PID.2’][‘PID.2.1’]=1;
tmp[‘PID’][‘PID.3’][‘PID.3.1’]=msg[‘patient_pid’].toString();
tmp[‘PID’][‘PID.5’][‘PID.5.1’]=msg[‘patient_pname’].toString();
tmp[‘PID’][‘PID.7’][‘PID.7.1’]=msg[‘patient_pdob’].toString();
tmp[‘PID’][‘PID.8’][‘PID.8.1’]=msg[‘patient_psex’].toString();
tmp[‘PID’][‘PID.11’][‘PID.11.1’]=”India”;
tmp[‘PID’][‘PID.15’][‘PID.15.1’]=”English”;
tmp[‘PID’][‘PID.16’][‘PID.16.1’]=”Single”;

//Adding data to ORC and OBR Fields
tmp[‘ORC’][‘ORC.2’][‘ORC.2.1’]=100;
tmp[‘OBR’][‘OBR.2’][‘OBR.2.1’]=100;
tmp[‘OBR’][‘OBR.4’][‘OBR.4.1’]=”003038″;
tmp[‘OBR’][‘OBR.4’][‘OBR.4.2’]=”Urinalysis”;
tmp[‘OBR’][‘OBR.4’][‘OBR.4.3’]=”L”;
tmp[‘OBR’][‘OBR.6’][‘OBR.6.1’]=currentdate;

I have mapped the pid in order to create a HL7 message with pid as a file name in destination. The code highlighted in red is the data values retrieved from database and other values are hard coded for simplicity. You can retrieve data from database and replace the hardcoded values.

dest_connector

Choose the Destination Connector Type as per your requirements. Here i have used File Writer in order to write the HL7 message. Choose Test Write to validate the existance of directory being selected. Choose any  File Name as you wish. I have used the pid(patient id) as the file name. The file will be saved with an extension(.hl7). Enable Append to File if you wish to create a batch file and choose File Type as ASCII, if you like to store the data values as ASCII characters. In the Template choose Encoded data.

In this tutorial we are going to see how to use an Userdefined Java class in Mirth. In this example, i have created a java class named Utility under org.amar.mirth package. My java class contains two userdefined functions.

UpperCase – To convert a String to UpperCase String

ConvertDOB – To convert date of birth to specified format (Ex: 19910518 to 18 May 1991)

Utility.java

package org.amar.mirth;

public class Utility
{
//Convert String to Upper Case
public String UpperCase(String str)
{
return str.toUpperCase();
}

//Convert DOB
//Example: 19910518 to 18 May 1991
public String ConvertDOB(String str)
{
String[] months={“Jan”,”Feb”,”Mar”,”Apr”,”May”,”Jun”,”Jul”,”Aug”,”Sep”,”Oct”,”Nov”,”Dec”};
String format;
int mon=Integer.parseInt(str.substring(4,6));
format=str.substring(6)+’ ‘+months[mon-1]+’ ‘+str.substring(0,4);
return format;
}
}

Create a jar file with the same class name(Utility.jar). Copy the Utility.jar file to $MIRTH_HOME/lib/ directory. Now restart the mirth server so that the jar file can be recognized as a valid file by mirth next time.

In the source transformer, create a new step with JavaScript type and use the userdefined functions wherever necessary.

//Import the package
var util = new Packages.org.amar.mirth.Utility();
//Message Modifications
msg[‘PID’][‘PID.5’][‘PID.5.2’]=util.UpperCase(msg[‘PID’][‘PID.5’][‘PID.5.2’].toString());
msg[‘PID’][‘PID.7’][‘PID.7.1’]=util.ConvertDOB(msg[‘PID’][‘PID.7’][‘PID.7.1’].toString());
msg[‘PID’][‘PID.5’][‘PID.5.1’]=util.UpperCase(msg[‘PID’][‘PID.5’][‘PID.5.1’].toString());

The variable util is the object reference to the Utility Class. Using this object you can access the methods defined in that class. The above code converts the patient name to uppercase name,date of birth to userdefined format and replaces the old one.

INPUT HL7 MESSAGE:

MSH|^~\&|LAB|1111111111|HUB|abc34abc34|20001020135010||ORU^R01|msg-ctrl-id-here|D|2.3
PID|1|123456789|987654321|60|krishnan^amarnath||19910518|M|||3317 MERLIN CT^^CHESAPEAKE^VA^23323||(757)487-5034|||U|
NTE|1|99| PT. PHONE:
ORC|RE|123456789|123456789-LA|
OBR||||||||||||||||
OBR||||||||||||||||
 

OUTPUT HL7 MESSAGE:

MSH|^~\&|LAB|1111111111|HUB|abc34abc34|20001020135010||ORU^R01|msg-ctrl-id-here|D|2.3
PID|1|123456789|987654321|60|KRISHNAN^AMARNATH||18 May 1991|M|||3317 MERLIN CT^^CHESAPEAKE^VA^23323||(757)487-5034|||U|
NTE|1|99| PT. PHONE:
ORC|RE|123456789|123456789-LA|
OBR||||||||||||||||
OBR||||||||||||||||